
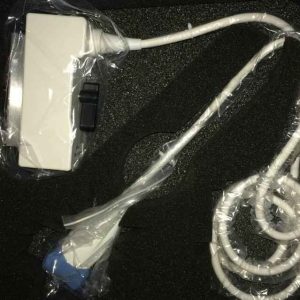
A compatible Landwind Mirror 2 Pro probe is a realistic alternative to a new OEM transducer, but only when the match is made against the exact probe model number, array type, and connector format on your existing head — not the console badge alone. Compatible probes for the Mirror 2 Pro are available through specialist suppliers who source transducers directly from China-based manufacturing networks. The safe sequence: read the model number and connector type off your current probe, send those details with photos, and get written confirmation of match and price before you commit. This guide covers identification, the evidence to demand, repair versus replacement, and common buying mistakes.
Which probes the Landwind Mirror 2 Pro uses
The Mirror 2 Pro is a portable, all-digital platform used by private practices and smaller clinics for abdominal, OB/GYN, small-parts, and vascular work. It drives a small set of transducers, and the array type follows the application:
- Convex (curved) array — the abdominal and obstetric workhorse, typically in the 2–5 MHz band on this platform.
- Linear array — for small parts and vascular imaging, typically in the 5–12 MHz range.
- Phased array — for cardiac work where the department performs echo studies.
These figures come from this page’s existing documentation; treat them as orientation, not a specification sheet. Before ordering, confirm the exact model string on the housing or connector collar of the probe you are replacing — that string, not the application label, is what a supplier matches against inventory.
Catalogue discovery versus item-specific evidence
The key distinction in compatible-probe buying is between finding a listing and proving a fit. A catalogue page, marketplace result, or connector photo tells you a probe might match your Mirror 2 Pro; it does not prove electrical and mechanical compatibility or working condition. Landwind is not as widely stocked as GE or Philips, so generic marketplaces rarely list matching probes, and those that appear often carry little identifying detail. Treat every listing as a starting point for questions, and require written confirmation of model number, connector format, and intended system before payment. Our guide on how to evaluate ultrasound probe supplier evidence sets out the questions worth asking any vendor.
Evidence checklist before you buy
Use this table to separate a supported purchase from a gamble:
| Checkpoint | What you need | Why it matters |
|---|---|---|
| Probe model number | Exact string from the housing or connector collar, sent as text plus photo | This is the only reliable key for matching inventory to your system |
| Array type and application | Convex, linear, or phased array, plus your clinical use | Prevents ordering a head that fits the socket but not your exam mix |
| Connector format | Clear photo of the connector and keying | Determines physical and electrical compatibility with the console |
| Written compatibility statement | Supplier confirms in writing which system and probe model the unit matches | Shifts mismatch risk from you to the supplier |
| Acceptance terms | Agreed checks and recourse if the probe fails on arrival | A quote without acceptance terms leaves a dead probe as your problem |
Repair versus replacement for a Mirror 2 Pro probe
Not every failed probe needs replacing. A cracked lens, a delaminated matching layer, a damaged strain relief, or a few dead elements are often repairable, and repair is usually cheaper when the acoustic stack is intact. Replacement makes more sense with a shattered array, extensive element loss, or fluid ingress. If you are unsure, describe the symptom — dropout lines, no image, or an intermittent connection — and ask for an assessment first. Our ultrasound probe repair service outlines the fault types typically candidates for repair. Do not assume a turnaround time or price for either route; get both in writing for your specific model.
Step-by-step sourcing workflow
- Identify the probe. Read the model number and connector type off the existing transducer; photograph the label and connector.
- Define the application. Note whether the head covers abdominal, OB/GYN, small parts, vascular, or cardiac work, so the replacement matches the array you actually use.
- Request a written quote. Send the model, connector photos, and application; ask for compatibility confirmation, price, and terms in writing.
- Compare repair against replacement. If the existing head has a repairable fault, price both routes before choosing.
- Run acceptance checks on arrival. Confirm the probe seats fully and the console recognises it without an error code; scan a phantom or uniform target for dropout lines indicating dead elements; check near and far field for even brightness without shadow bands; flex the cable near the strain relief while imaging to rule out an intermittent break.
- Document the outcome. File the written confirmation, quote, and acceptance results with the equipment record so the next purchase starts from evidence, not memory.
Common mistakes when buying a compatible Mirror 2 Pro probe
- Shopping by console name alone. “Probe for Mirror 2 Pro” is a search term, not a part number; several different heads can sit under one console label.
- Trusting a connector photo as proof. A similar-looking connector proves neither electrical compatibility nor system recognition.
- Skipping written confirmation. If the probe does not match, the written record is what protects you.
- Scrapping a repairable probe. Lens, cable, and strain-relief faults are often economical to fix.
- Skipping the acceptance scan. Dead elements and intermittent cable breaks show up in the first phantom sweep; finding them later complicates any claim.
Probe condition in the wider fleet
A compatible purchase is also a good moment to review the probes you already run. A multicentre BMUS survey of probe condition in clinical use found that a substantial share of in-service transducers had faults visible on inspection or testing — defects are common and often unnoticed. The AIUM recommends periodic transducer inspection and functional testing rather than waiting for image complaints. And whichever probe enters service, reprocessing between patients must follow your facility’s infection-control policy, aligned with CDC guidance on disinfection and sterilization of healthcare equipment.
Requesting a quote
Because pricing depends on the exact model, array, and connector, reputable suppliers quote per request rather than publishing a fixed list. Browse the compatible ultrasound probe catalogue, then send your Mirror 2 Pro probe model number, connector photos, and application through the contact page. You receive compatibility confirmation and pricing in writing before you commit. If you also run mainstream platforms, the same model-based sourcing applies across brands — our GE-compatible probe range shows how that works.
Frequently asked questions
Can I buy a compatible probe for the Landwind Mirror 2 Pro instead of an OEM one?
Yes. Compatible probes for the Mirror 2 Pro are available through specialist suppliers sourcing from China-based manufacturing networks. The match must be made against the exact probe model number, array type, and connector format, and confirmed in writing before you pay.
How do I identify which probe model my Mirror 2 Pro needs?
Read the model number printed on the transducer housing or connector collar, note the array type (convex, linear, or phased array) and your clinical application, and photograph the connector. Send those details to the supplier so inventory is matched to your system without guesswork.
Is it better to repair my Mirror 2 Pro probe or buy a compatible replacement?
It depends on the fault. Cracked lenses, delaminated matching layers, damaged strain reliefs, and a few dead elements are often repairable, while a shattered array, extensive element loss, or fluid ingress usually points to replacement. Describe the symptom and get a written assessment and quote for both routes before deciding.
What should I check when a compatible probe arrives?
Confirm the probe seats fully and the console recognises it without an error code, scan a phantom or uniform target for dropout lines, check near and far field for even brightness without shadow bands, and flex the cable near the strain relief while imaging to rule out an intermittent break.
Sources
- AIUM — Official Statement on Transducer Testing and Repair (periodic inspection and functional testing): aium.org
- CDC — Disinfection and Sterilization of Healthcare Equipment: cdc.gov
- BMUS multicentre survey of ultrasound probe condition in clinical use: pmc.ncbi.nlm.nih.gov